Creating an onboarding tour is not a set-and-forget task. Use data-backed insights to continuously iterate and improve.
If someone starts your product tour but then just clicks “Next“, “Next”, “Next”, and completes it in a few seconds, they quite possibly haven’t got the chance to actually understand how your product works.
You don’t want your users to speed through the onboarding. You also don’t want to exhaust and overwhelm them with lengthy tours that explain anything and everything about your product.
So, what makes a successful onboarding tour? Hint: It’s relevant, timely, and contextual.
Let us walk you through the ins and outs of crafting tours that will inform and delight your users.
What are onboarding tours?
Onboarding tours, also known as product walkthroughs, are in-product guides that help your users discover the value of your product and get started with completing their tasks quickly.
Tours typically include multiple steps, showing up within a pop-up modal, slide-out, or another format that appears on the page and guides users towards their “aha!” moment and onboarding success.
Why are tours such a powerful tool for user onboarding?
Aside from being a driver of product and feature adoption, tours are one of the essential elements of product experience, especially for first-time users.
Let’s take a look at the key benefits that tours can bring.
Meet users where they are
Having people sign up for your product, create an account, and click an activation link within the email isn’t enough. These are essential milestones of an activation flow, but to successfully onboard new users you should add an in-product guide to help them find their way within the context of your product.
Help users find value quickly
The purpose of a product tour is to help users discover the product value as soon as possible by reaching their “aha!” moment. To accomplish this, a tour mustn’t be too long, too general, or too detailed. It’s your chance to leave a great first impression, so make sure not to waste precious users’ attention.
Offer step-by-step guidance
With multi-step walkthroughs, you can point users in the right direction and help them get started without overwhelming them with irrelevant information. When you tailor your tours to different audience segments, you’ll be able to guide them through the steps they need to take. Providing a “Remind me later” or a “Snooze” option is also an excellent way to help users learn at their own convenience.
What does a successful onboarding tour look like?
Not all tours are created equal. Let’s look into what makes them effective and engaging.
Successful tours are relevant ✔️
People learn by doing, but the level of stress rises when there’s too much information to comprehend at once. If that happens, driven by fear that they won’t be able to complete the task at hand, people become anxious – and more likely to dismiss or escape a tour.
This is exactly the scenario you want to avoid. Long tours could increase anxiety, so break them up into shorter ones with a few steps. Giving users a chance to easily implement your guidance is crucial for success.
In other words, don’t try to teach everything – and everyone – at once. Target different user segments with different tours to make sure they get the most relevant information at the right stage of their journey.
For example, to get users to adopt more advanced product functionality, help them discover advanced features and understand the value. Create a tour that focuses on the benefits and directly speaks to any pain points your product is solving.
However, not every user is going to be ready for advanced features, especially if they haven’t mastered basic functionality. As you build your tours, consider the right time to show a tour for a specific segment. This brings us to the next point – timeliness.
Successful tours are timely ⌛
When someone signs up for your product, they are typically excited to play with it and start exploring the functionalities and possibilities. But showing a tour as soon as someone lands for the first time can cause resistance.
Give your new users a moment to breathe. Don’t throw a comprehensive tutorial at them the very second they enter the product. Keep in mind that it’s all new to them, give them time to adjust and acclimate to the environment, and offer to start a tour at a more suitable time.

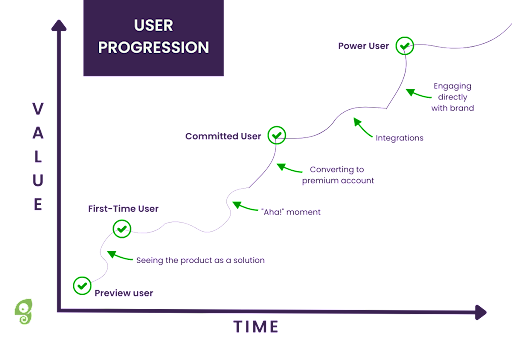
As users progress through different stages of their journey – from first-time users to power users – help them continuously discover new value in your product.
The bottom line: For the best results, segment your users and offer exactly the help they need, when they need it.
Successful tours are contextual
The onboarding flow is your chance to leave a good first impression on new users, and you won’t have this opportunity twice. Be mindful of the cognitive load your users are dealing with at the given moment.
Keep your tours clear, concise, and instantly understandable.
Embrace the notion of self-discovery and offer self-serve support. Instead of highlighting everything you want your users to know, focus on motivating them to take the actions that will help them complete the task.
Remember, if users don’t find your tour valuable, they will simply exit. After that, they’ll be less open to further learning in the future.
Is your onboarding tour already performing well?
The best way to evaluate the current state of your onboarding tours is to have relevant benchmark data you can use to compare your tours to the top-performing ones.
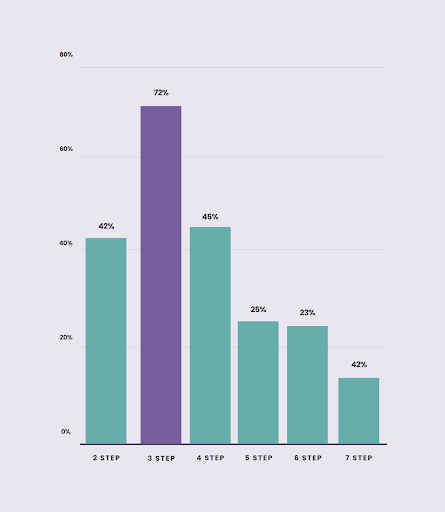
The latest In-Product Experiences Benchmark Report from Chameleon shows that – with a 72% completion rate – three-step tours are the most effective. Add one step, and the completion rate drops to 45%, while seven-step tours have only a 16% completion rate.
When it comes to time spent on a tour, Chameleon’s Benchmark Report reveals that users spend an average of 119 seconds interacting with a tour. If there’s a short video included, the time spent increases to 156 seconds.
Adding images, GIFs, or any other media type will also motivate users to engage more and stay longer with a tour, as opposed to text-only tours.
But that’s not to say that the copy you use doesn’t matter. It does – and every word counts. Craft a compelling message using 25 words per tour step, and you’ll get yourself a tour that perfectly fits into benchmarks as most engaging.
Pro tip: Use benchmark data as a guiding light, but keep in mind that each tour you create should fit the nature of your product and align with your goals.
Craft a perfect onboarding tour in 3 steps
Building an effective product tour is no breeze.
It requires a good understanding of UX principles, as well as data-backed insights about your users’ behavior while interacting with your product. It’s both art and science, and it includes planning, data analysis, and continuous iteration.
Here are the three steps to ensure your onboarding tours bring the best results.
Step #1: Set a clear goal for each tour ️ ✔️
Before going into the design, style, and copywriting, make sure that your onboarding tour has a clear goal.
Here, you can answer questions like:
- Which audience segment is this tour targeting?
- What do users need to know at this point?
- What actions should they take next?
- What is the desired outcome you want to see?
Focus on one goal per tour. Try to go beyond the completion of the tour, and define the metric you want to track. In other words, be outcome-driven, not output-driven.
For example, if your onboarding tour is showcasing how a specific feature works and you want users to take certain action after completing it, e.g. to click on a “Get started” button, you can start tracking the button clicks and set a measurable goal to analyze the tour performance. This goal could be, for example, to have at least 50% of users who completed the tour acting upon it and using the feature.
Also, make sure to provide clear accountability to someone on your team to own product tours and be responsible for regular updates. This way, you’ll be able to resolve problems quickly while understanding how your tours are performing.
Step #2: Understand what success looks like
This step has two layers:
- What the success looks like from your (business) perspective, e.g. increased activation rates, higher product adoption rates, more conversions from free-to-paid plans, etc.
- What the success looks like from your users’ perspective, e.g. discovering the value of your product, solving a problem, completing tasks successfully, etc.
Put your users first. Build a tour that truly helps them go smoothly through the onboarding, realizing that your product delivers on its promise from the value proposition.
The more successful your users are with your product, the more product success you’ll see.
This brings us to the definition of success from the perspective of your product. What is that desired outcome you want to see? Make sure to have your whole team on the same page about the success definition and the metrics you will track along the way.
Once you’ve built your tour, you should focus on collecting and analyzing the data. For this purpose, ensure you have your product analytics tool connected to be able to understand the big picture.
With a tool like InnerTrends, you can also save time by leveraging the pre-built reports.
For example, to better understand what’s happening within your onboarding flows, you could go into the report “What actions do accounts perform between onboarding steps?”. It will showcase the behavior specific to people who reach the next step and actions specific to people who abandon.
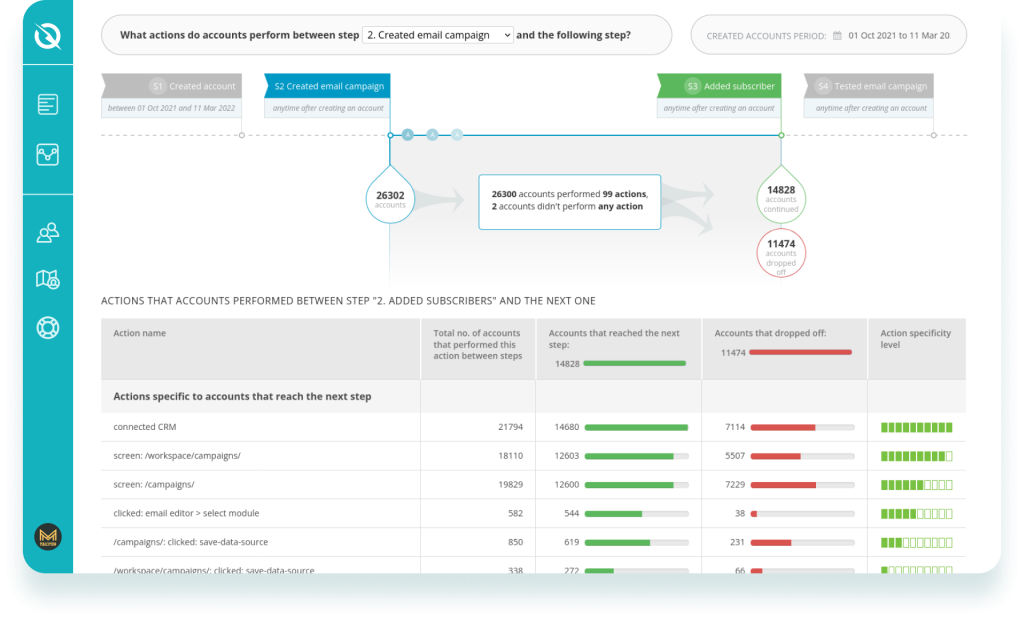
InnerTrends pre-built analytics report: Impact of user actions on onboarding success
Step #3: Iterate based on the data insights ️
Use the tour performance data and user behavior analytics to uncover potential problematic areas, issues you need to fix, or tour steps you need to improve in your onboarding flow.
This is where you can start experimenting with your tours. Here are a couple of experiments you could use:
- If you notice a major drop-off after the first step of your tour, consider changing the copy, adding an image, GIF, or a short video. You can then A/B test different versions of your tour, compare the results, and keep the one that keeps users engaged throughout.
- If the majority of users are dismissing the tour before even starting it, you can experiment with changing the on-page trigger that starts the tour or you could add a “Snooze” option to enable users to take the tour at their own pace. The abovementioned Benchmark Report shows that 18% of users will snooze the tour if given a chance.
- If a large portion of your new users is taking too much time to complete the onboarding, try simplifying the steps or splitting one long tour into several shorter ones that will appear when users are ready to take the next steps.
The bottom line: Assess how well your tours are performing, act upon the insights to iterate, and continue to improve until you accomplish the goals.
Create onboarding tours with the purpose: Key takeaways
Depending on your product type, your audience, and overall goals, as well as your users’ specific needs and jobs to be done during the onboarding, each tour will have its purpose and a goal.
The goal is often to onboard first-time users with ease, but you can also use tours to explain how new features work and onboard existing customers to an upgraded plan or advanced features.
For the best results, make sure to:
- Keep your onboarding tours timely, relevant, and contextual
- Craft short, compelling tours that don’t overwhelm or distract users
- Don’t neglect the importance of clear and concise copy in tour steps
- Define clear goals, analyze the performance data, and iterate to improve
A well-structured tour shown at the right time, in the right place, to the right users will boost your product and feature adoption. Plus, you’ll see customer satisfaction and retention go up.
***

This article is written by Nadja Bozovic who manages all things content at Chameleon, a tool that helps you build your in-product experiences without coding. With 10+ years of content management experience under her belt, she specializes in writing about product, UX, and SaaS.